Using Vaadin In IBM Domino
Vaadin can be used as a UI technology in Domino. This page will contain the instruction how to setup the development environment and to get started with your first Vaadin app in Domino.
The steps for setting up XPages SDK are:
-
Download the XPages SDK for Luna and above from OpenNTF
-
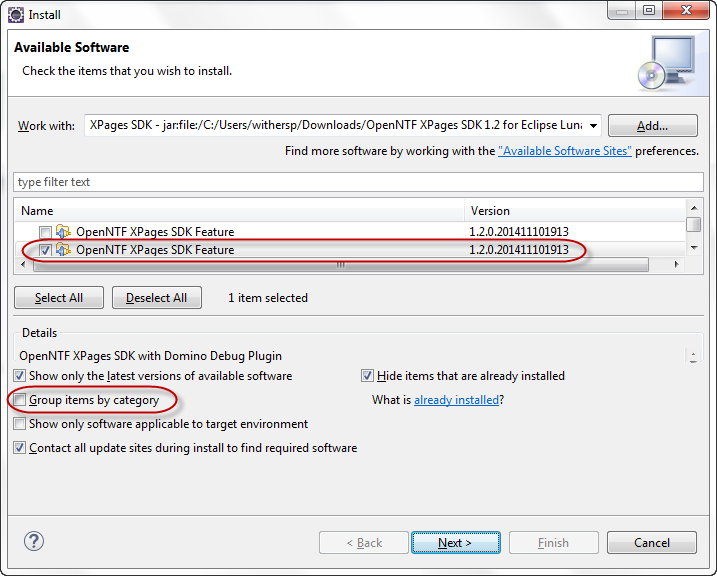
In Eclipse, from the Help menu select Install New Software….
-
Select Add…, then choose Archive… and navigate to the zip file downloaded.
-
You will need to deselect Group items by category. Two features will show. The first includes sources, so select the second and click Next.
-
Accept the terms and finish the dialog. You will be prompted to restart Eclipse to complete the install.
-
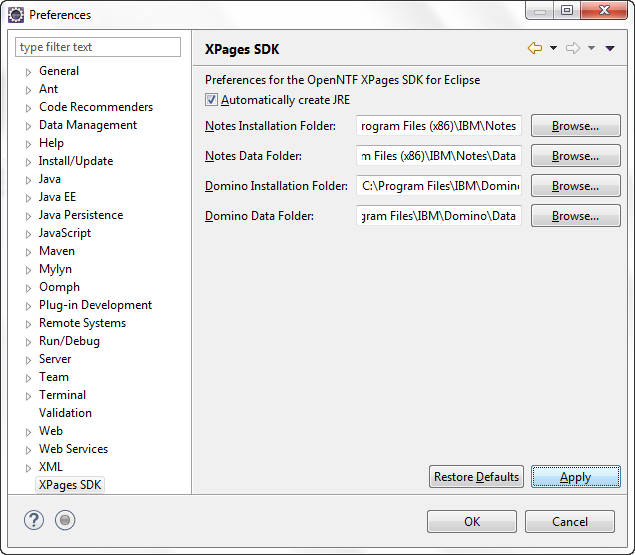
Select Window > Preferences (on Mac the location is Eclipse > Preferences). In the XPages SDK category tick Automatically create JRE and point to your local Notes and Domino installs. Then click Apply.
-
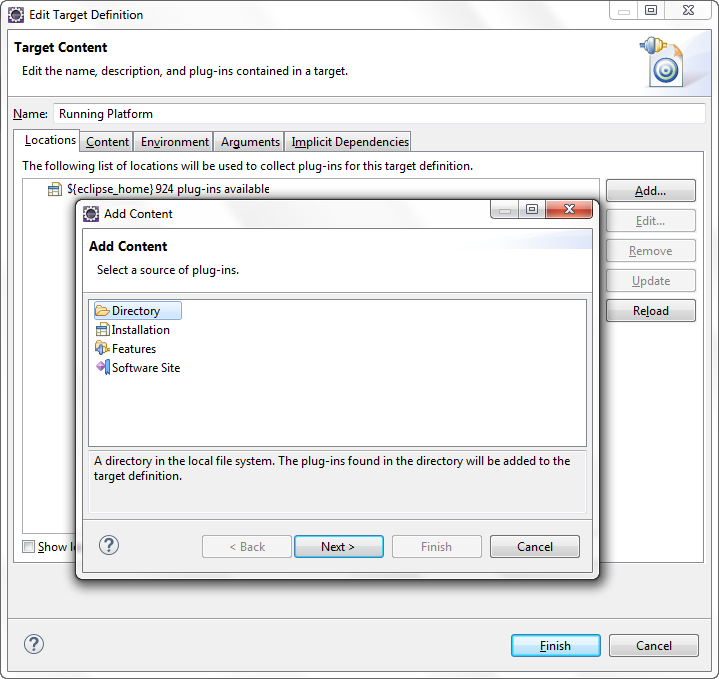
In the Java > Installed JREs category you should now have two additional options, “XPages Domino JRE” and “XPages Notes JRE”. Under Plug-in Development > Target Platform click Add…. Select the Domino Install Target template and complete.
-
Apply this as the target platform.


If you do not have a Domino server installed, there is an alternative approach. However, to test your OSGi plugin, you will need to create a Feature project, add the Plugin to that feature, then create an Update Site Project, add the feature to the update site, build and export. Then you will need to import that into an Update Site database on your server. This is the same process for creating and testing any other OSGi plugin on the server, such as XPages Extension Library.
-
Download the IBM Domino Update Site for Build Management from OpenNTF. This is basically a zip file that contains features and plugins required for Maven and Tycho development in Eclipse, but also has all the dependencies required for Eclipse.
-
In Eclipse, go to Window > Preferences (on Mac the location is Eclipse > Preferences). Then go to Plug-in Development > Target Platform.
-
Edit the existing target platform configuration and in the dialog, click Add…, then Directory, then Next. Browse to and select the folder where you extracted the Update Site.>
-
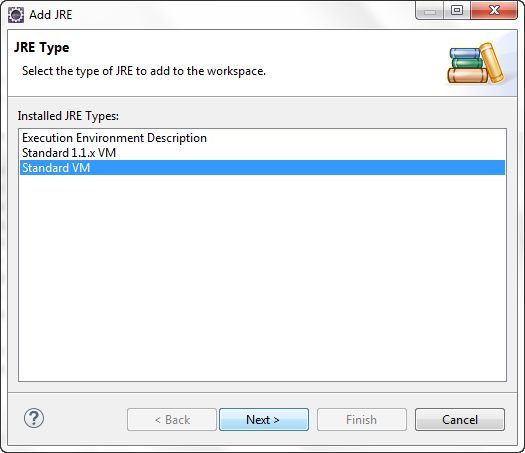
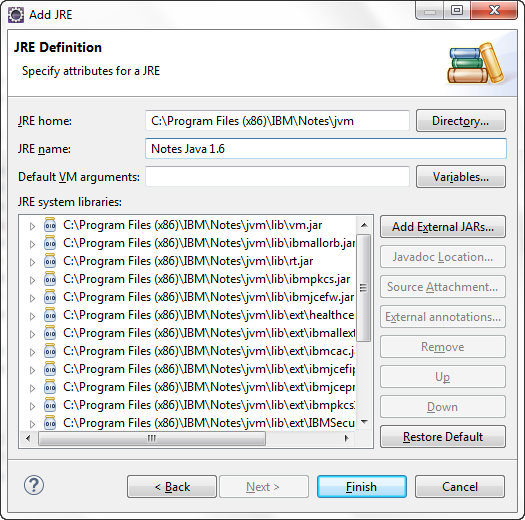
The current release of Domino, 9.0.1, only supports Java 1.6. The next release, probably called Domino 9.0.2 and expected to ship first half 2016, is expected to include Java 1.8. But in the meantime, it’s best to set the JRE accordingly. In the preferences, go to Java > Installed JREs category.
-
Add…, Standard VM, then Next
-
Click Directory and browse to your IBM Notes install’s “jvm” library. Give it an appropriate name and click Finish. Alternatively, if you don’t have IBM Notes installed on the development environment, download Java SE 6 SDK from Oracle.
Setting up Vaadin
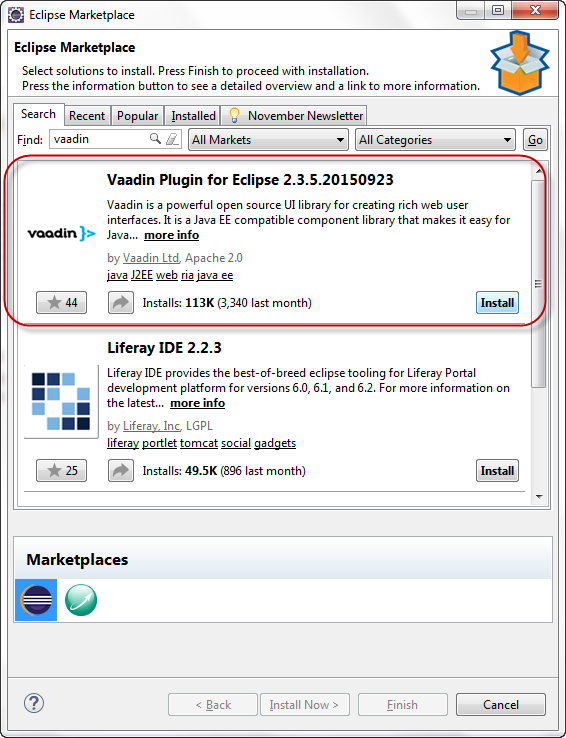
Eclipse has a set of Vaadin plugins that can easily be installed to set up your environment.
-
Select *Help > Eclipse Marketplace….*
-
Search for "Vaadin" amd install theVaadin Plugin for Eclipse
-
The options to install will include the Vaadin Designer, so leave all selected, confirm and accept the license. You will be prompted to restart Eclipse to complete the install.
Hello World Example
Now the development environment is set up, it’s time to create a Hello World application. But this one will not just print “Hello World” to the browser, instead it will add in the other key aspect, integrating with Domino. Maven is a useful tool for loading dependencies automatically, but will require the IBM Domino Update Site for Build Management mentioned earlier. So at this point the approach will just create a simple non-Mavenized plugin.
-
In Eclipse, select File > New > Plug-in Project and give it a name. As an OSGi plugin, tell it to run with the OSGi framework “Equinox”.
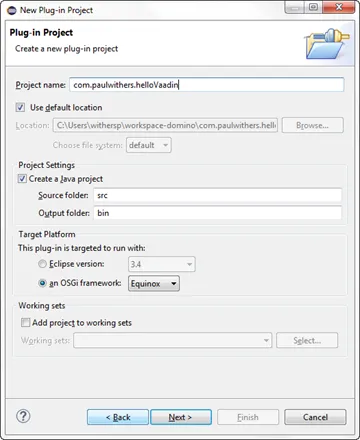
-
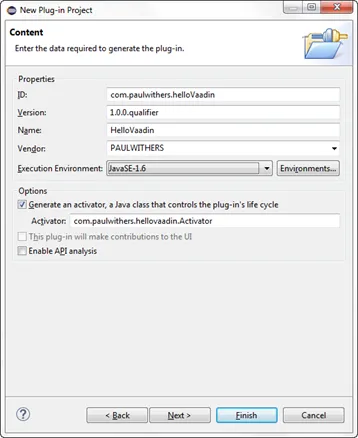
Until the next release of Domino is out, the execution environment needs to be changed to Java 1.6. Then finish – the Eclipse perspective used for development is not significant at this stage.
-
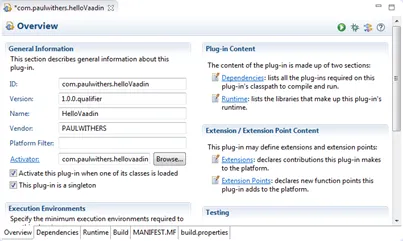
The MANIFEST.MF will be opened and some additional configuration is required. The plugin should be set as a singleton on the Overview tab.
-
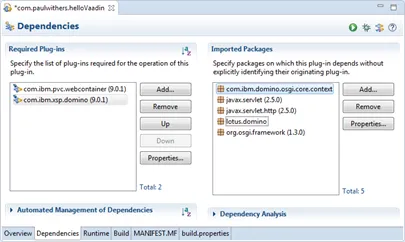
On the Dependencies tab some plugins and packages need loading for OSGi and Domino, as below.
-
Back on the Overview tab, click the Extension Points link and confirm you want to display the Extension and Extension Point pages.
-
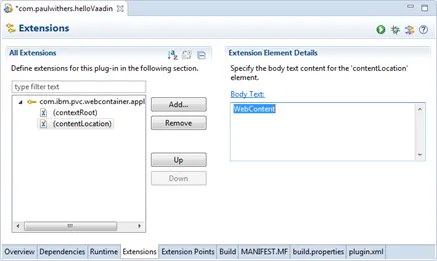
On the Extensions tab, click Add… and choose
com.ibm.pvc.webcontainer.application.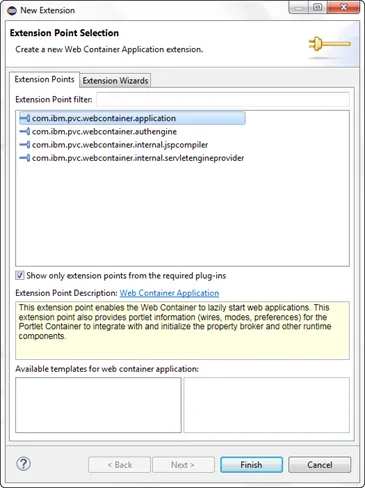
-
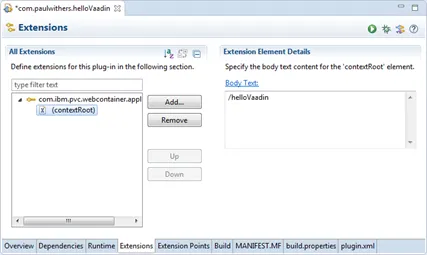
Set the contextRoot to “/helloVaadin”.
-
Right-click on com.ibm.pvc.webcontainer.application and select New > contentLocation. Set it to “WebContent”. These two steps can be done by manually typing the relevant XML onto the plugin.xml tab and I would recommend you loop at what the resulting XML is.
-
Next download the Vaadin jar files that will be needed from the Vaadin releases website. The README.txt file outlines the steps required to add it to the project, but are repeated below.
-
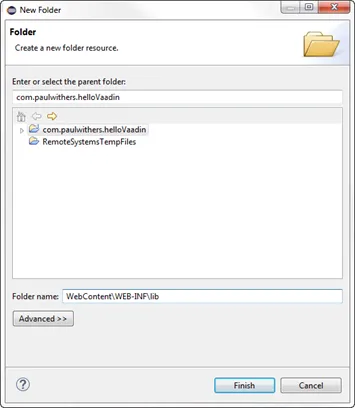
Right-click the project and select New > Folder and call it WebContent/WEB-INF/lib.
-
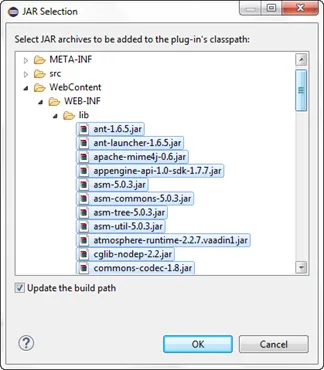
Copy all jars to WebContent/WEB-INF/lib. Copy all jars in the lib folder to WebContent/WEB-INF/lib.
-
In the MANIFEST.MF, on the Runtime tab in the Classpath section, click Add… and add all the jar files added to WebContent/WEB-INF/lib. You must select the jars, not the folder. Then remember to move the “.” entry to the top of the list.
-
Right-click the WebContent/WEB-INF folder and select New > File. Call it web.xml.
-
Paste in the code below:
Source code
XML
<?xml version="1.0" encoding="ISO-8859-1"?>
<web-app version="2.5" xmlns="http://java.sun.com/xml/ns/javaee"
xmlns:xsi="http://www.w3.org/2001/XMLSchema-instance"
xsi:schemaLocation="http://java.sun.com/xml/ns/javaee
http://java.sun.com/xml/ns/javaee/web-app_2_5.xsd">
<display-name>HelloVaadin</display-name>
   <welcome-file-list>
     <welcome-file>index.html</welcome-file>
     <welcome-file>index.htm</welcome-file>
     <welcome-file>index.jsp</welcome-file>
     <welcome-file>default.html</welcome-file>
     <welcome-file>default.htm</welcome-file>
     <welcome-file>default.jsp</welcome-file>
   </welcome-file-list>
   <context-param>
       <description>Vaadin production mode</description>
       <param-name>productionMode</param-name>
       <param-value>false</param-value>
   </context-param>

   <servlet>
       <servlet-name>HelloVaadinServlet</servlet-name>
       <servlet-class>com.vaadin.server.VaadinServlet</servlet-class>
       <init-param>
           <param-name>UI</param-name>
           <param-value>com.paulwithers.hellovaadin.HelloVaadinUI</param-value>
       </init-param>
   </servlet>

   <servlet-mapping>
       <servlet-name>HelloVaadinServlet</servlet-name>
       <url-pattern>/*</url-pattern>
   </servlet-mapping>
</web-app>
This first block gives a list of default URL extensions accepted for mapping and tells the application to run in development mode. The <servlet> block gives the servlet name and points to a class we will create later which will initialise the NotesThread required for talking to Domino. The initParam points to a class we will create later that will be the entry point into the application.
-
Right-click com.paulwithers.hellovaadin and select New > Vaadin Design. You will need an evaluation or full license for Vaadin Designer. To get the trial license, log into the vaadin.com website and go to https://vaadin.com/designer#license-modal.
-
Call the design page “WelcomeDesign” and use the Vertical Layout template. Finish and confirm to switch to the Vaadin perspective.
-
Drag and drop a new Label onto the page (components are displayed alphabetically). In the Properties view set the name to “label1”. Click the ellipsis button next to StyleName. Select “LABEL_H2” and click Add →, then OK. Change ComponentAlignment to “TOP_CENTER”. Save and close.
-
Switch back to the Plug-in Development perspective. This is better suited to plugin development. Note the “WelcomeDesign.html” and “WelcomeDesign.java” files. Review WelcomeDesign.java.
-
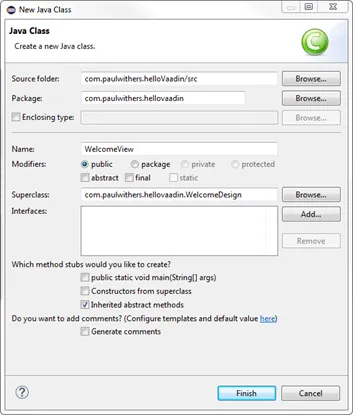
Right-click on com.paulwithers.hellovaadin and select New > Class. Call it WelcomeView and set the superclass as WelcomeDesign.
-
Add the following code to the class to extend the auto-generated class and to compute the value of label1.
Source code
Java
import com.ibm.domino.osgi.core.context.ContextInfo; public class WelcomeView extends WelcomeDesign { private static final long serialVersionUID = 1L; public WelcomeView() { super(); try { label1.setValue("Welcome " + ContextInfo.getUserSession().getEffectiveUserName()); } catch (final Exception e) { // TODO: handle exception } } } -
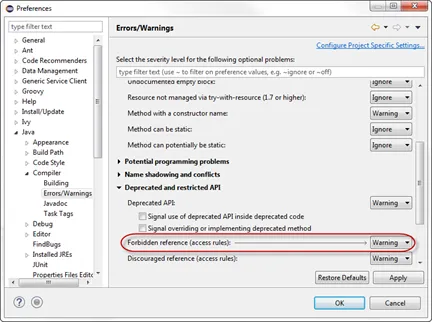
You may get an error that the method Session.getEffectiveUserName() is not API. That can be fixed by amending the Java compiler settings, by changing the setting for forbidden reference to “Warning”.
-
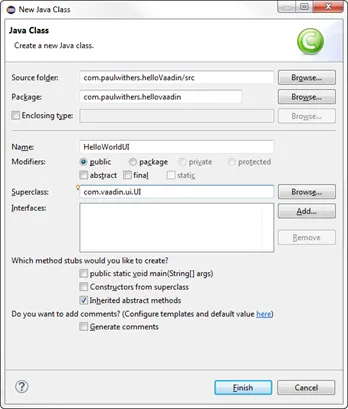
Right-click on src/com.paulwithers.hellovaadin and select New > Class. Class it “HelloVaadinUI” and set the superclass as “com.vaadin.ui.UI”.
-
Add the following code to the class:
Source code
Java
import com.vaadin.server.VaadinRequest;
import com.vaadin.ui.UI;

public class HelloVaadinUI extends UI {
    @Override
    protected void init(VaadinRequest request) {
        final WelcomeView welcome = new WelcomeView();
        setContent(welcome);
    }
}
This creates an instance of the WelcomeView class just created and loads it to the page.
-
On the Build tab ensure META-INF, WebContent, plugin.xml, src are all ticked for Binary Build.
-
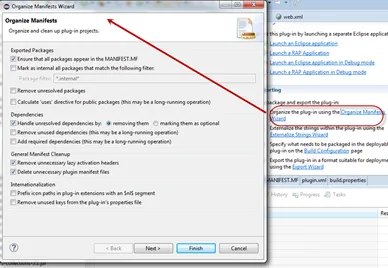
On the Overview tab, launch the Organize Manifests Wizard and complete.
-
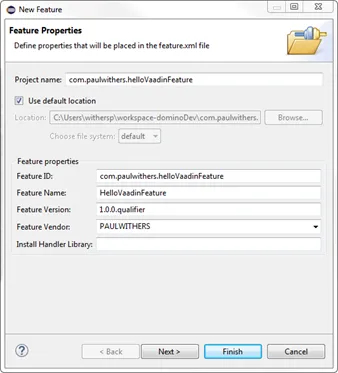
Select File > New > Feature Project. Call it com.paulwithers.helloVaadinFeature.
-
Click Next and initialize from the com.paulwithers.helloVaadin plugin.
-
Select File > New > Update Site Project. Call it com.paulwithers.helloVaadinUpdate and click Finish. Click Add Feature… and select com.paulwithers.helloVaadinFeature. Click Build All.
-
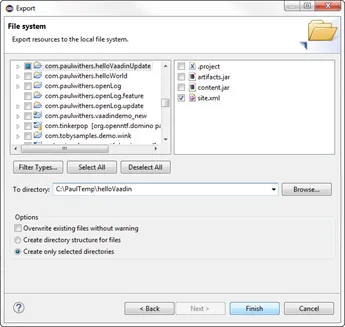
Right-click com.paulwithers.helloVaadinUpdate and click Export…. Choose General > File System. You only need to select the site.xml. Export to an appropriate location.
-
In an Update Site database on the relevant server, import the update site by pointing to the site.xml.
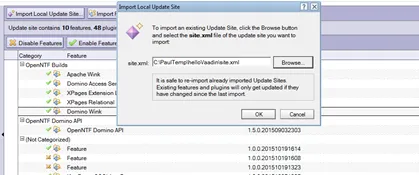
As with any OSGi plugin, you will need to issue “restart task http” command to the server for the plugin to be available.
-
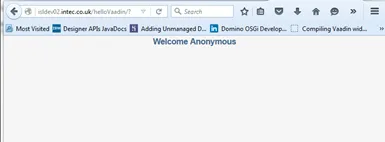
If you browse to the “helloVaadin” URL on the server (corresponding to the contextRoot in the plugin.xml), you should now see “Hello Anonymous” message.
If you log in or prefix the contextRoot with the filepath of a database
that does not allow anonymous access, you will see a welcome message for
the current logged in user.
