Each view has a route through which it can be accessed.
A URL is used to select the required route.
Interaction with the application includes navigation between the different views.
You can navigate around the views in an application in two basic ways: either by interacting with the UI or by entering a URL to directly navigate to a specific view.
When navigating with buttons or other components in a UI, the browser URL can be updated to reflect the current view.
The user can then copy or link the URL to give direct access to the specific view.
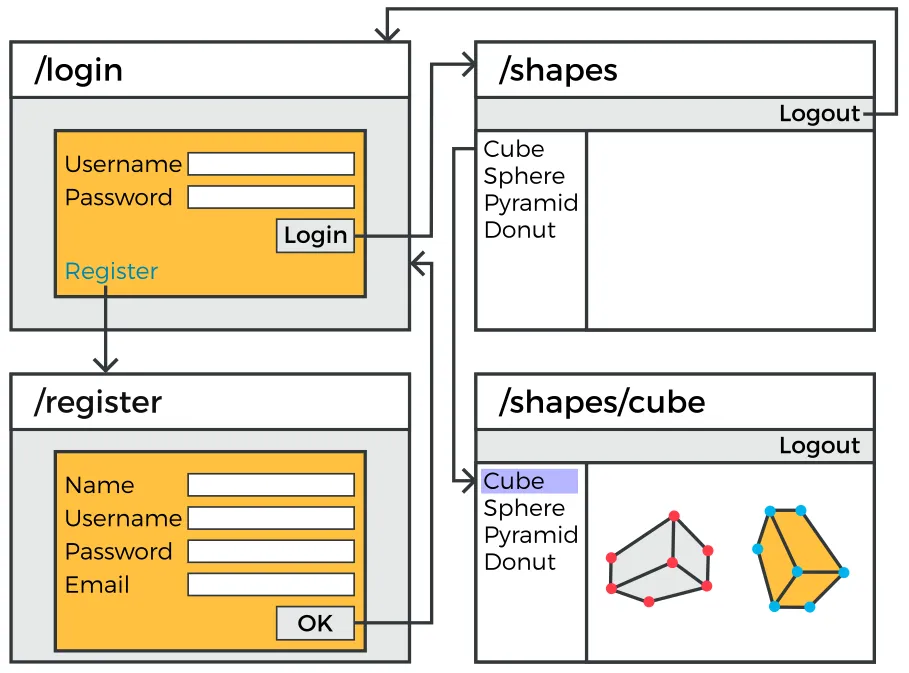
Routing URLs to content
Routing maps URLs to views or resources to navigate directly to the desired content or functionality.
Typically, the root route / shows a main view, a route such as /users could show a sub-view that displays a list of users, and a route with the user ID as a parameter, such as /users/dadams, would show a specific user.
You can have routes to views written in either Java or TypeScript, and you can mix them in the same application.
While Java views require a server connection, TypeScript views also work offline.
In Java views, use the @Route annotation to define a route for a view.
Source code
LoginScreen.java
package com.vaadin.demo.flow.routing;

import com.vaadin.flow.component.html.Div;
import com.vaadin.flow.component.login.LoginForm;

@Route("/login")
public class LoginScreen extends Div {
    public LoginScreen() {
        LoginForm loginForm = new LoginForm();
        // Implementation details omitted
        add(loginForm);
    }

}
index.ts
import { Router } from '@vaadin/router';
import { Flow } from '@vaadin/flow-frontend';

// Get automatically generated routes to server-side views
const { serverSideRoutes } = new Flow({
  imports: async () => import('../../../../../target/frontend/generated-flow-imports'),
});

export const router = new Router(document.querySelector('#outlet'));

// List all the application routes here
router.setRoutes([
  {
    path: 'routing-login',
    component: 'routing-login',
    action: async () => {
      await import('./routing-basic');
    },
  },
  {
    path: 'routing-registration',
    component: 'routing-registration',
    action: async () => {
      await import('./routing-registration');
    },
  },
  // For server-side, the next magic line sends all unmatched routes:
  ...serverSideRoutes, // IMPORTANT: this must be the last entry in the array
]);
See Creating a Main View for an introduction to creating a main view with a menu bar to select from a set of sub-views.
To navigate to a view, you need to get a link to the view.
The following features are supported:
Child routes, such as /main/users and /main/premises.
Route aliases, such as showing /main/users as the default view when /main is entered.
Fallback routes, such as showing an error page for a path such as /users/invaliduser.
Route parameters, such as /users/:userid to catch URLs such as /users/dadams.
Redirects, such as redirecting root route / to /login.