Coming from GWT to Vaadin, I am looking out for ways to use the good parts of GWT and see how they can be applied to Vaadin. So this is the first post in a series around that subject. When you are interested in a specific topic we should write, please let us know.
The first and most obvious thing (at least to me) is using UiBinder when creating a client side Widget for a Vaadin Component
-
The main advantages for using
UiBinderI’ve seen in projects are: - ● easier to create a clear, semantic structure for the layout in HTML than in Java code
- ● easier to maintain
- ● forced separation of layout and logic
- ● directly use HTML from mocks, created to present the layout to the customer
- ● makes it possible to let the colleagues, responsible for the visual parts of the application, work on the HTML and CSS themselves
- ● only using components when necessary speeds up the page display
Although some features of UiBinder, like having style in the layout file, are not that interesting in the context of a Vaadin application, there are still good reasons to use it. And here is how it works with Vaadin 7.0 (beta3):
- 1) Make sure to have the GWT plugin for Eclipse installed
-

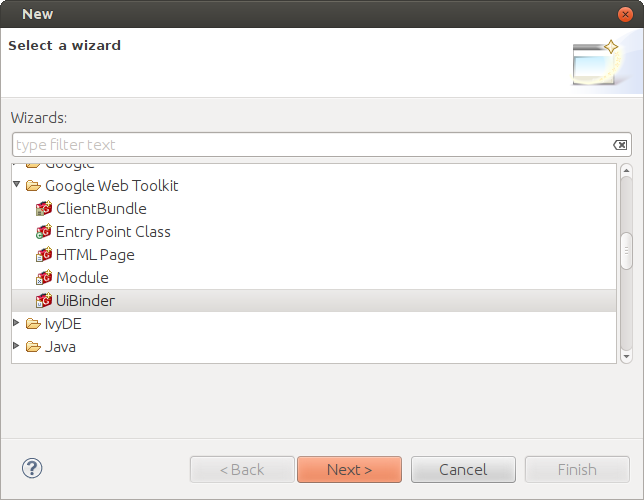
- 2) Open the dialog of Eclipse to create a new file (e.g. the toolbar icon, Ctrl/Cmd-n or the context menu of the Project explorer) and select the wizard for “UiBinder” in the folder “Google Web Toolkit”. Click next.
-

- 3) Add the necessary information and click finish.
- Choose the client package of your widgetset
- I guess you would always choose “GWT widgets” for the “Create UI based on” setting. When using HTML, the files are set up in a way that does not allow the use of
Widgets, just standard HTML elements are allowed (can be changed later). Getting data in and out is still possible in this case. - Feel free to add sample content and comments.
This creates two files:
-
●
<Name>.java -
The view implementation where you add the api to the
Widgetto get data in and out -
●
<Name>.ui.xml -
The
UiBinderfile for the HTML layout
It is important that the Java file and the UiBinder file are stored in the same package.
From here you can either create the connector and server side component files as you would for a non-UiBinder Widget, or use the contents of the files as a template for your other Widgets where you want to add a UiBinder file.
I added an enhancement ticket (#9937) to add the possibility to create the UiBinder file directly when creating a Widget with the Widget wizard of the Vaadin Eclipse plugin, to get ridd of these additional steps.
The template files look like this:
- Sample.java
-
		public class Sample extends Composite {
  private static SampleUiBinder uiBinder = GWT.create(SampleUiBinder.class);
  interface SampleUiBinder extends UiBinder <Widget , Sample> {}

public Sample() {
    initWidget(uiBinder.createAndBindUi(this));
  }
}
You can basically extend this class from any view Widget you need. Composite is used to prevent leaking out the api’s to the outside, so you can provide a clean api to access this Widget. In lines 2 and 3, the UiBinder is instantiated, and in line 6 set to the content of the Composite
- Sample.ui.xml
-
		<!DOCTYPE ui:UiBinder SYSTEM "http://dl.google.com/gwt/DTD/xhtml.ent">
<ui:UiBinder xmlns:ui="urn:ui:com.google.gwt.uibinder"
xmlns:g="urn:import:com.google.gwt.user.client.ui">

  <g:HTMLPanel>
  </g:HTMLPanel>
</ui:UiBinder>
Here you see that the access to the GWT Widgets is provided through a separate namespace. When you have a collection of base Widgets on your own, you can add these through a separate namespace in the same way.
The HTMLPanel is used as the main element in the content. If you need, you also can have any other GWT panel or a div element here instead. HTMLPanel allows you to mix HTML and Widgets, which is not possible in the other cases.
Now, how to get data in and out of the HTML? This is done via the ui:field attribute in the UiBinder file. In the view implementation, add a corresponding global variable with the @UiField annotation. GWT then injects the respective Widget or HTML element into this variable.
-
For example, when adding this to the
UiBinderfile, ... -
		<g:HTMLPanel>
  <label ui:field="label"></label>
  <g:TextBox ui:field="field"></g:TextBox>
  <g:Button ui:field="button"></g:Button>
</g:HTMLPanel>
- you can add this to the view implementation to access them:
-
		@UiField LabelElement label;
@UiField TextBox field;
@UiField Button button;
The types and the value of the elements with ui:field attribute must correspond to the entry in the UiBinder file. Please note: in HTML the field label is attached to an HTML element, so the type of the variable needs to be one of the GWT DOM classes.
- Accessors to the fields:
-
		public void setLabel(String labelString) {
  label.setInnerText( labelString);
}

public String getFieldValue() {
  return field.getText();
}
When the Button is just used to attach an EventHandler, it is in principle not necessary to add it as a UiField, but I had the case that SuperDevMode optimized out the EventHandler when this declaration was not there.
-
Speaking of which: This is how you add an
EventHandlerto the Button in case you need it: -
		@UiHandler( "button")
public void handleClick( ClickEvent event) {
  Window.alert( "Hello " + field.getText());
}
UiBinder offers many more features, like directly adding CSS, access to external resources, support for internationalisation, that might not be necessary in a Vaadin context. But in case you need it, you can learn more in the GWT documentation for UiBinder