
With the WebAuthn API, it is now possible to perform strong multi-factor authentication (MFA/2FA) on mobile and desktop browsers in a standardized way. We can allow (or require) users to authenticate using facial recognition, fingerprint, or a hardware security key such as Yubikey or Google Titan. This article pops the hood of a recent Vaadin Labs experiment to show how WebAuthn works in the context of the demo. You can read my post about MFA to get a high-level view of MFA and biometric/hardware authentication and an introduction to the demo.

Biometric authentication has become familiar to most users through their mobile devices (Face ID, Touch ID, etc.) For developers, the Webauthn standard makes it possible to build cross-platform solutions leveraging hardware authentication.
Now that the technology is supported widely, the next task is to make it simple for developers to design effective solutions that users would readily embrace. To guarantee that the user experience is easy to comprehend and utilize, every multi-factor solution requires a lot of attention to detail.
A sub-par implementation can harm security through reduced adoption and by creating loopholes (e.g., account recovery might become the weakest link).
Goals
We wanted to test whether we could produce a reusable solution that was simple to use for both the developer (DX) and the user using our Vaadin Labs project (UX).
The goals were:
- Create a drop-in API that makes it a no-brainer to protect important actions with in-application MFA (not only protecting login).
- Make sure the resulting UI is intuitive and easy for the user, without additional work from the developer.
The demo does include "Require MFA at login" functionality, but this is primarily to provide a more complete picture of how a real application might work - most production solutions would integrate with some sort of authentication solution, such as Spring Security, Keycloak, Okta, and so on, and MFA at login is quite familiar to most. We specifically wanted to investigate the DX and UX of "in-application MFA," which is unfortunately not currently possible with most solutions.
Although the result is not yet a fully finalized, production-ready solution, the potential seems clear.
WebAuthn - the enabling API
WebAuthn authenticates the user using public-key cryptography. Each user-device and domain has its own key pair. This key pair is transferred when the user enables WebAuthn during the "enroll" step.
The server first requests that the browser prompt the user to generate credentials for the site ("enroll"), after which the credentials are provided back to the server to be saved.
On the user’s device, a secret key is stored in hardware, either on the device itself (laptop, phone) or on an external hardware security key such as Yubikey – the latter is called a “portable” authenticator, as it can be used with multiple browsers and on multiple devices (being tied to one device is the main drawback with the otherwise convenient fingerprint-based authentication, something “Passkeys” will address – see sidenote.
Later, when the user needs to authenticate, the server uses the stored credential to create a “challenge” that can only be answered by someone with the matching credentials.
The demo uses the Webauthn4j library to perform the verification steps on the server. This library also integrates with Spring Security and is used by various other solutions. As a rule of thumb, rely on some trusted solution to perform cryptographic operations, never roll your own. Other Java options you might consider including one from Yubikey.
In summary, when you execute MFA.validate() in Java, a popup appears in the browser, and when the user clicks the button, a call is made, which triggers the authentication on the client side and sends the result back to the server for validation. If the authentication is successful, the protected action can be performed.
Most of this can be encapsulated in a generic base class, but some things like saving and fetching user data needs to be customized. This is a one-time affair – just extend the base class adding the needed customizations.
Since this demo also has an “external authenticator” feature, the popup has a bit of hidden complexity, using Collaboration Kit behind the scenes to communicate with the external device.
Note: Just as this demo was first published, the FIDO Alliance announced “Passkeys”. This is an effort supported by major players, and provides the same type of secure authentication with the added benefit that the passkeys are synchronized between your devices, effectively working as a portable authenticator.
As of this writing, iOS 16 and MacOS Ventura have gained support, along with Android and Chrome. This looks very promising indeed, and 2023 might be the year we can finally get rid of passwords.
The good news is that passkeys is fully compatible with Webauthn; with an up to date phone, you can already use passkeys at labs.vaadin.com/mfa.
However, as you may have seen, a few UX modifications may be required, and the "external device" flow may now use native Passkeys support instead. Some businesses may choose not to have the credentials synced across all of the user's devices and may deactivate passkey functionality.
Enroll
The user first needs to add (enroll) an authenticator, and from the developer's perspective, this is achieved by calling MFA.enroll() and saving the resulting Authenticator for the user.
new Button("Add authenticator", click -> {
           MFA.enroll(user, userRepository, success -> {
               // MFA enabled! Update UI as appropriate.
           });
All the code needed in ProtectedView.java to enable MFA
Behind the scenes, the server instructs the browser to generate a new credential based on the data supplied. The demo calls a simple client-side script with the following parameters:
UI.getCurrent().getPage()
               .executeJs("return MFADialog.createCredentials($0,$1,$2,$3,$4,$5)",
rpName, rpId, random, userId, username, displayName)
               .then(success -> { // …verify & store credentials }
The client-side just makes a call to the browser API, and returns the results:
createCredentials(rpName, rpId, random, uid, username, name) {
   const publicKeyCredentialCreationOptions = {
     // Challenge, server & user ids, etc options received from server
   };
   const credential = await navigator.credentials
      .create({
        publicKey: publicKeyCredentialCreationOptions,
      })
      .catch(function (err) {
        console.info(err);
      });
   // encode credential and send to server, which stores authenticator for user
}
JavaScript runs in the browser to create credentials based on options received from the server
For the user, adding/enrolling an authenticator will look like this; first, the browser presents some options:
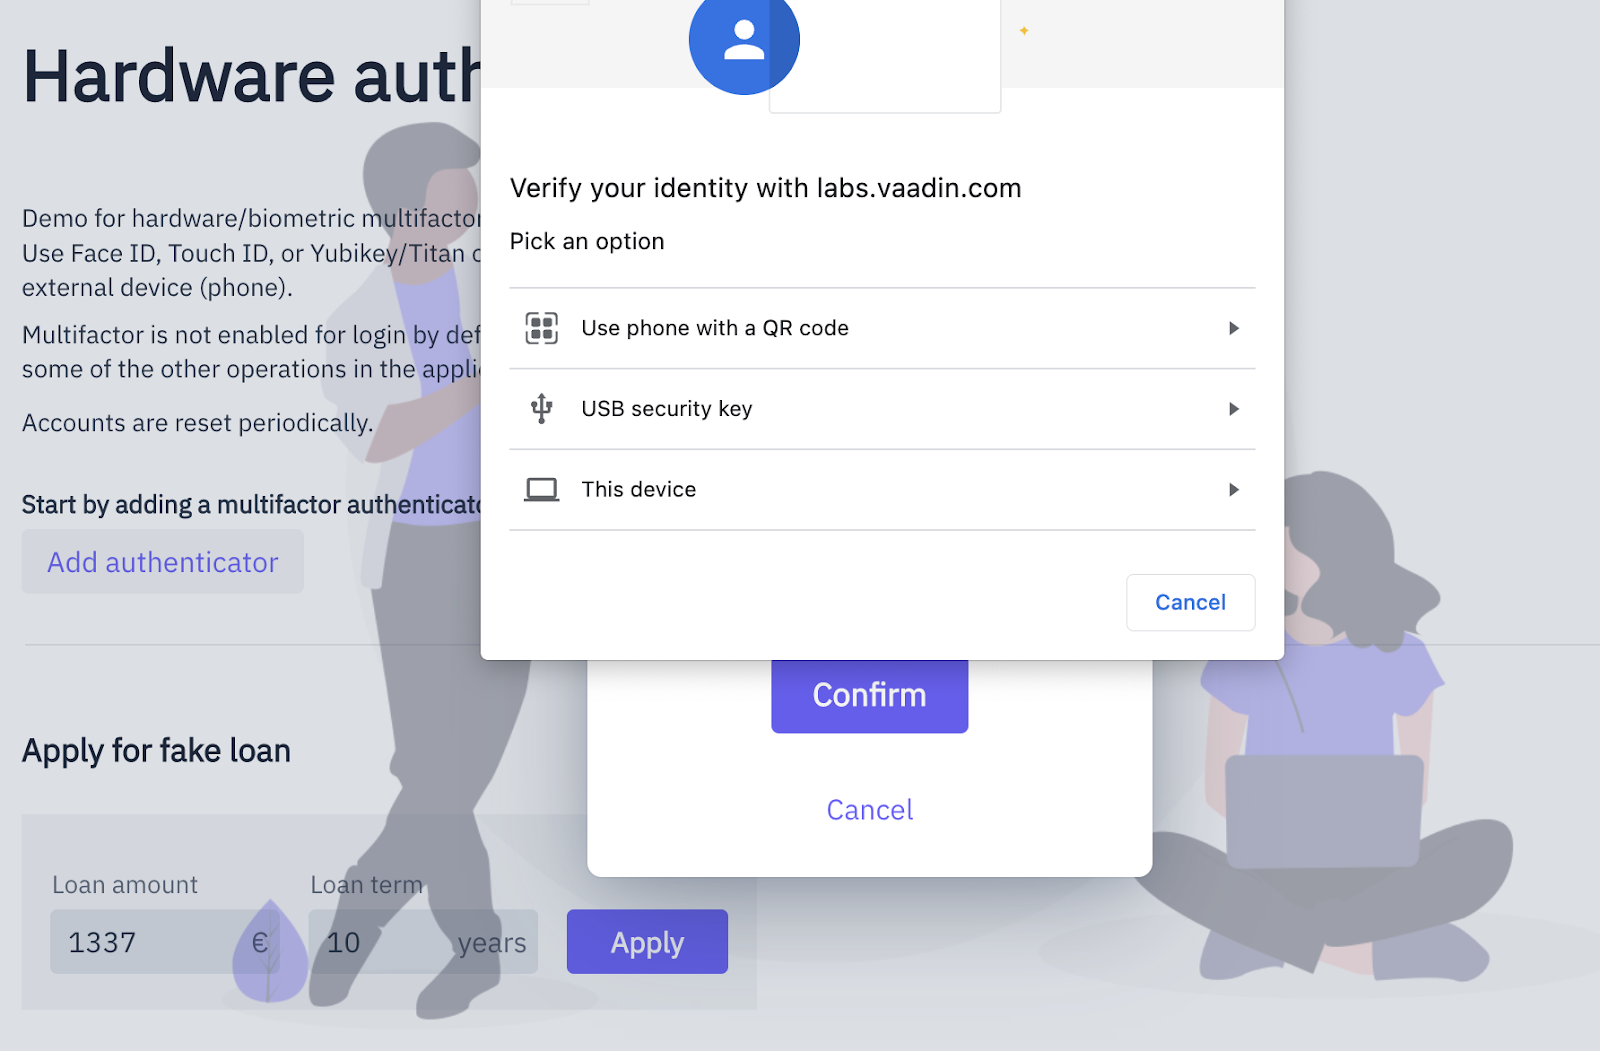
The first option is the new “Passkeys” standard, available on updated phones. The second option is an external USB security key (Yubikey, Titan, …). Choosing “This device” (if available) will use the built-in fingerprint reader or similar:

The browser now has one part of the key, while the server has the other. The key pair is only valid for the domain it was created on, and can only be used over HTTPS, effectively stopping man-in-the-middle attacks.
From now on any action can be protected with MFA by wrapping the action with a call to MFA.validate().
Verify
For instance, consider a button invoking applyForLoan() when clicked:
new Button("Apply", click -> {
           Integer a = amount.getValue();
           Integer t = term.getValue();
           applyForLoan(a, t);
       });
We can wrap applyForLoan() with a call to MFA.validate() to protect it with multi-factor authentication:
new Button("Apply", click -> {
           Integer a = amount.getValue();
           Integer t = term.getValue();
           MFA.validate("Apply for loan",
                   "Apply for a " + a + "€ loan with a " + t + "-year term.",
                   user, userRepository,
                   success -> {
                       applyForLoan(a, t);
                   });
       });
Protecting applyForLoan() with MFA
When the user needs to be authenticated, the server sends a challenge (made using the stored credentials) to the browser, which authenticates the user using some trusted method (e.g fingerprint, same as when enrolling). Then cryptographically signs the challenge and returns it to the server for verification.
We rely on Webauthn4j to create the challenge, and similar to the enroll phase, use an executeJS call to pass the required data to the browser:
private void validate(Authenticator authenticator) {
       random = UUID.randomUUID().toString();
       byte[] rawId = authenticator.getAttestedCredentialData().getCredentialId();
       String credentialId = Base64.getEncoder().encodeToString(rawId);
       ObjectMapper mapper = new ObjectMapper();
       String transports = "[]";
       UI.getCurrent().getPage().executeJs("return MFADialog.verifyCredentials($0,$1,$2)", random,
               credentialId, transports).then(success -> { // …verify challenge answer }
The client-side triggers authentication, and returns the result to the server for verification.
verifyCredentials(challenge, credentialId, transports) {
   const publicKeyCredentialRequestOptions = {
// Challenge, id and allowed transports received from server
…
   };
   // Verify, answer the challenge
   const assertion = await navigator.credentials
     .get({
       publicKey: publicKeyCredentialRequestOptions,
     })
     .catch(function (err) {
       return undefined;
     });

   // Encode assertion and send to the server
   const encodedAssertion = {...};
   return encodedAssertion;
 }
JavaScript runs in the browser to verify and answers the challenge sent by the server
The user is presented with a popup similar to enrolling:

Notice that the popup tells the user exactly which action they are about to confirm.
The demo is set up to automatically call enroll() if the user is not yet enrolled when validate() is called. This removes the need to have separate logic for this.
External device flow
A novelty in this solution is that the user can use an external device (usually a phone) as the authenticator, even when the new “Passkeys” are not available, provided that the device supports some sort of biometric authentication such as Touch ID or Face ID. The user does not have to install anything on the device, but if they want, the page can be installed as a PWA for faster access. This flow uses Collaboration Kit to coordinate between the user’s different sessions (desktop and mobile).
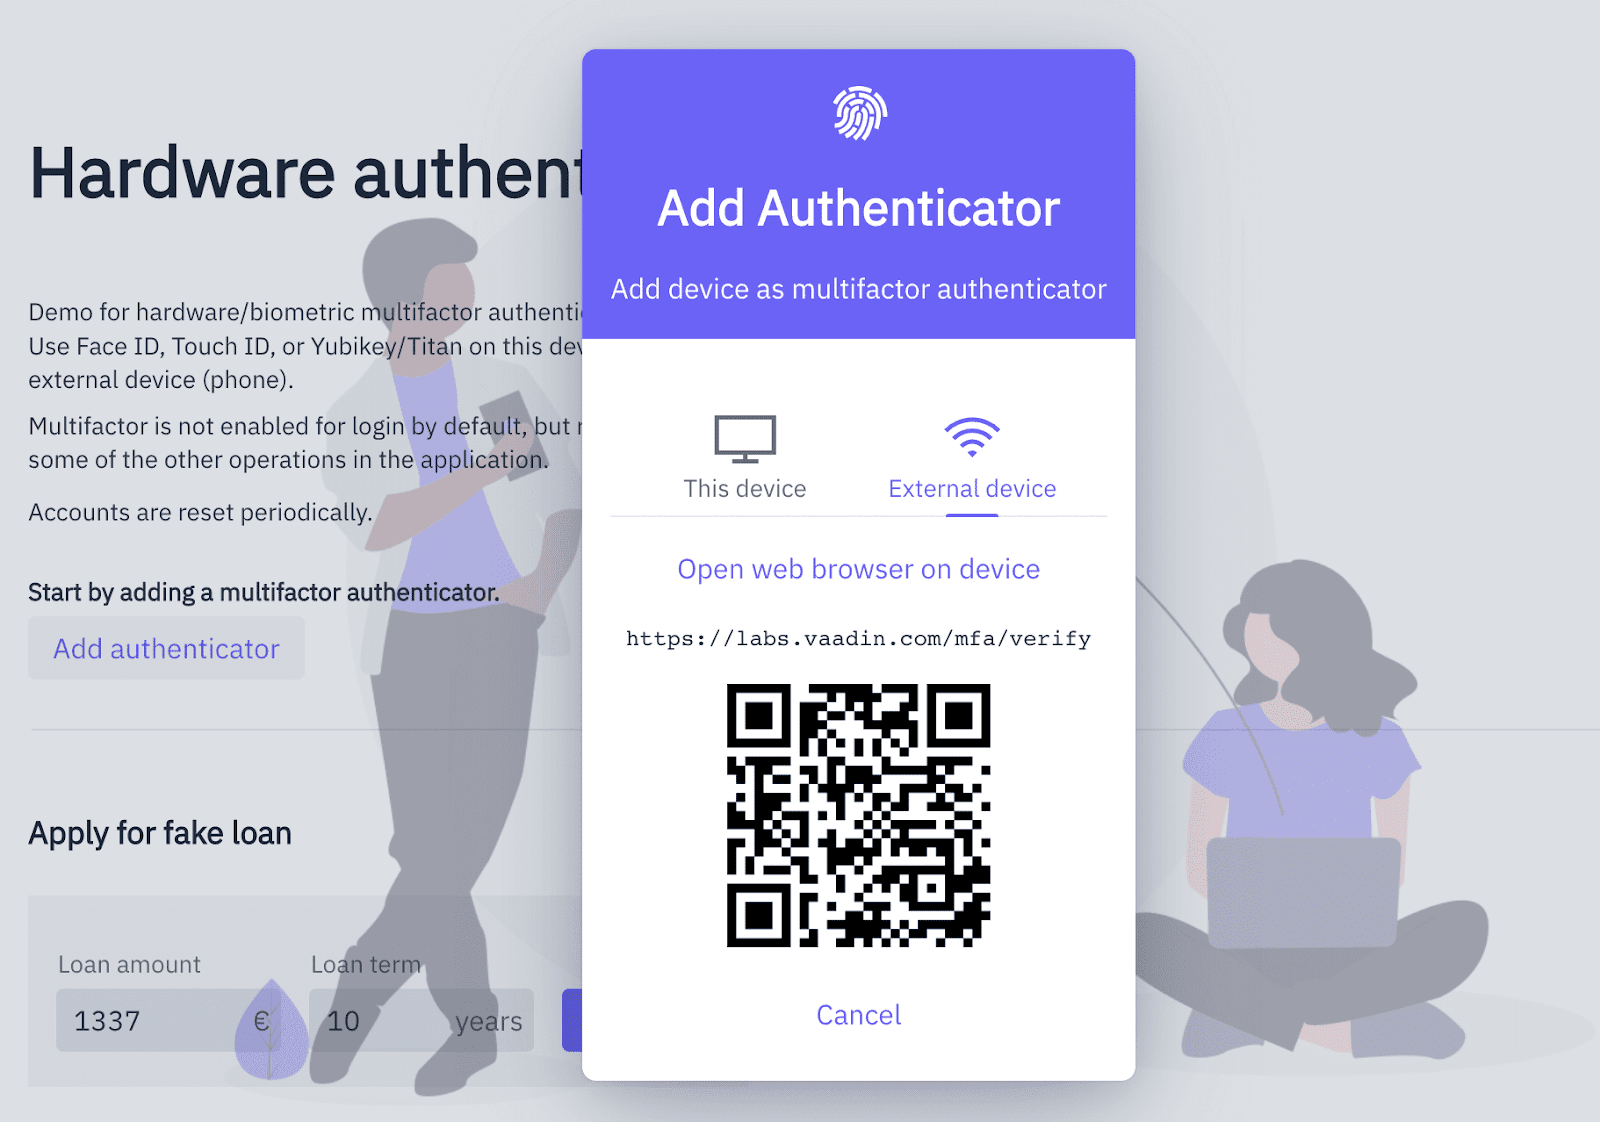
Scan the QR code with your phone.

The phone can now be used as an authenticator.
Note: Once the new “Passkeys” standard is widespread enough among your target audience, the need for this external device flow will fade away, as Passkeys support is implemented on a platform (device/browser) level.
Final thoughts
By leveraging the WebAuthn API and paying attention to best practices and the user experience, multi-factor authentication can be turned into a no-brainer for developers and users alike.
Support for Passkeys is moving forward rapidly and might be a perfect solution in many cases. The good news is that it uses the same Webauthn API described above, requiring little or no changes if you already implement Webauthn. Adjusting the UX slightly to nudge the user in the right direction might be all that’s needed, a bit more if you decide to go completely passwordless.
For many applications, the best option is to use an external identity and access management solution, such as Keycloak, Okta, AD or similar. Currently, the support for Webauthn sometimes leaves a bit to be desired, especially from a UX perspective. In particular, “in-app MFA” as demoed here, is slightly problematic.
The brand new Passkeys show great potential, and although widespread adoption can take time, it will probably push solutions to implement better support for Webauthn.
Maybe 2023 will be the beginning of the end for both weak passwords and easy phishing. Here’s to hoping!
Passkeys is a candidate for a future demo and write-up; let us know if you are interested! Try the demo, and let us know what you think!
In particular, let us know if you're planning to implement MFA (as everyone should!) We'd love to discuss the topic and hear about your expectations for a solution like this. Is login enough for your case, or do you see the benefit of “in-app MFA” as demoed here?