Vaadin Directory
The Vaadin Directory is an online listing of packaged Vaadin add-ons that are free and open source. It serves as a channel for easily finding, promoting, and distributing Vaadin add-ons. Registered Vaadin users can download and publish their own Vaadin add-ons. The Vaadin Directory can display add-ons published via Maven Central or also handle the distribution of the add-ons through zip file downloads or custom Vaadin Maven repository.

Registering on vaadin.com
Before you can use or publish anything in the Vaadin Directory, you must register as a vaadin.com user. Typically, you create a personal account for yourself, but you can also create an account for your team or company. Consider these options if you are publishing work that is not entirely authored or owned by you.
When registering, provide as much information as possible. At a minimum, this includes your email, first and last name, and contact information: email, phone number, and address.
After registering you can modify your visible information in your Profile-page at any time and access your already published add-ons at My Components -page.
Using Vaadin Add-ons
Add-ons are designed to be "drop-in packages" for web projects that use the Vaadin framework.
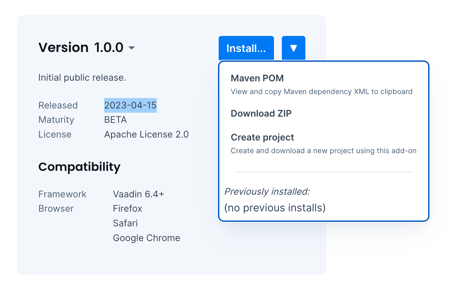
There are three ways to install Vaadin add-ons:
Copy Maven dependency snippet
Create a new project using start.vaadin.com
Download a Java JAR or full ZIP file
Installing with Maven
Note: These instructions assume (and recommend) that you created your project using one of the Vaadin project templates at https://start.vaadin.com.
Vaadin add-ons distributed via the Directory are served from their own Maven repository at https://maven.vaadin.com/vaadin-addons. Add the following repository to your project's pom.xml:
<repositories>
  <repository>
    <id>vaadin-addons</id>
    <url>https://maven.vaadin.com/vaadin-addons</url>
  </repository>
</repositories>
-
Copy the Maven dependency snippet from the add-on details page in the Vaadin Directory and paste it into the dependencies section of your pom.xml.
-
Recompile your project. During the build, the Vaadin Maven plugin will handle the installation of:
- Vaadin 6-8: GWT widgetset compilation, see: https://vaadin.com/docs/v8/framework/addons/addons-maven.html.
- Vaadin 10-13: WebJars using the Bower build.
- Vaadin 14+: npm build using the webpack frontend build.
- Vaadin 24+: npm build using the Vite frontend build.
- You can then start using the add-on:
- Themes: Add an
@Theme("theme-name")annotation to your UI class. - Components and widgets: These are Java classes that you can use right away in your IDE.
- Tools: Follow the add-on documentation on how to install and run the tool.
-
The add-on page typically contains helpful information and links to samples and tutorials. Follow these to learn more about a specific add-on.
Creating Vaadin Add-ons
Individuals, teams, and companies can publish their work in the Vaadin Directory. For publishing license options, see the Vaadin Community Terms. If you have a personal account, keep in mind that any add-on published to the directory will display your name as the author. If you are building an add-on together with someone else, or the add-on you are publishing is owned by a company, we recommend that you create a separate user account for the collaboration or company.
Available Add-on Types
Add-ons are divided into five categories in the Vaadin Directory:
- UI components (with client and/or server-side implementations).
Data components (for example, a data-source implementation).
Themes (CSS + images).
Tools (for Vaadin development).
Miscellaneous (other helpful Vaadin add-ons).
Add-on Licenses
Vaadin Directory allows you to publish your work under different open-source licenses. The supported licenses are listed in the Publishing Software section of Vaadin Community Vaadin Community Terms.
Free Add-ons
Vaadin Directory offers a choice of the following open-source licenses:
- Apache License 2.0 (recommended)
- GPL 3.0
- LGPL 3.0
- AGPL 3.0
- BSD
- Public domain
- EPL 1.0
- MIT
To support as many users as possible, we recommend you use the well-known open-source Apache License 2.0. Most add-ons use this as it is the same license that Vaadin uses.
Directory Packaging
There are a couple of options for packaging your add-on for distribution in the Vaadin Directory. Typically, you should create your add-on project with a recommended project template, and the package will be created automatically for you.
When distributing through the Directory, the package must be an add-on bundle. Technically, an add-on bundle package is a standard ZIP file. Use this to package the add-on, external dependency libraries, and documentation into a single distribution package. The name implementation title in your manifest file will be the name of your add-on.
If you distribute through Maven Central, a standard pom.xml is required. Also, make sure you add the "Vaadin keyword to the description tag.
Creating add-on projects from a project template for Vaadin 14+
For Vaadin 14+, the easiest way to create an add-on project is to use a template project. There are two alternatives, depending on the type of add-on. There are three different templates available:
- vaadin/addon-template: This is a Java-only addon suitable for composite components and quick prototypes using existing Vaadin components.
- vaadin/client-server-addon-template: Build a standalone, client-server TypeScript-Java component. This template provides you with a Lit-based example to start with.
- vaadin/npm-addon-template: Wrap a Web Component or any other JavaScript or TypeScript library from npmjs.com as a Vaadin Java component.
See Creating Components and Integrating a Web Component for more information.
You can create a new project by selecting "Use this template" in GitHub, naming your repository, and then selecting "Create repository from template."
Note: Select the "Include all branches" option to include support for all the Vaadin versions. If left unchecked, your template will only support the latest Vaadin version. When developing, make sure you're using the branch that matches your Vaadin version.
These projects contain a pom.xml file that is configured for packaging and publishing to the Vaadin Directory.
Creating add-on projects with the Maven archetype for Vaadin 8
The easiest solution for packaging a Vaadin 8 project is to use Maven project packaging. When you use a proper Maven archetype, all the packaging details for add-on will be correct when you generate a new project for the add-on. This includes special manifest entries and ZIP packaging for directory distribution. The suggested archetype is available from GitHub.
To create a release:
- Set the version information for the release in the pom.xml, or use the Maven release plugin to do the release for you. You cannot upload snapshot packages to Vaadin Directory.
- If you didn't use the Maven release plugin, use the command
mvn packageto create a compatible ZIP file. - Upload the ZIP file to the directory.
Exporting using the Eclipse plugin for Vaadin 7 and 8
The Vaadin Eclipse plugin includes an exporter for Vaadin Directory packages. Use the plugin to package add-on as a JAR file.
Steps to export a package:
- Choose the Vaadin add-on project.
- Go to File > Export and select Vaadin Directory Package (type "vaadin" to filter field).
- Choose the files to include in the JAR. Note:
- The plugin chooses all source code and classes by default. Exclude any unnecessary files.
- Remember that client-side GWT implementations need the source code in order to work.
- Fill in the manifest information, choose the destination file and select Finish:
- Implementation title: The unique official name of the add-on (for example, "RatingStars"). This cannot be changed after upload to Vaadin Directory.
- Implementation version: Version of the add-on JAR (for example, "0.4" or "0.4.2"). This cannot be changed after upload to Vaadin Directory.
- Implementation vendor: Official name of the add-on vendor (for example, "Vaadin Ltd"). You may use a team name or several names here.
- License title: Official name of the add-on license (for example, "Apache License 2.0")
- Widgetsets: Name of the add-on widgetset, if any (for example, "org.vaadin.browsercookies.widgetset.BrowserCookiesApplicationWidgetset")
Make sure the export succeeds without compile warnings.
Testing Add-ons
Before publishing, you need to test your add-on thoroughly. Focus on the client-side code and browser issues, as well as validation of the API and dependencies. The general rule is that you cannot test your add-on too much. Here are some testing tips:
- Testing the add-on in an empty Vaadin project:
- Create an add-on package.
- Create a new application project and import your add-on JAR into the project.
- For Vaadin 14+: create a project at start.vaadin.com or use a empty starter.
- For Vaadin 8: use the Maven vaadin-archetype-application.
- Write a small test view - this can also serve as a code sample later.
- Browser compatibility testing:
- Test with the browsers that are relevant to you and your users.
- Don't mark any specific browser as supported, unless you have tested it.
- Use a simple real-life test application. E.g. the application created in previous step.
- Test with other components as well.
Testing on different Vaadin versions:
-
- Change the Vaadin version JAR in your project to the oldest version you wish to support. Recompile both client and server-side code and test the add-on in an application.
- Vaadin 7 add-ons are typically compatible with version 7.2.0+.
- Vaadin 8 add-ons are typically compatible with 8.1+.
- Vaadin 14 add-ons will typically also work with the latest Vaadin version.
- Make sure you are using Java 8 to maximize backward compatibility.
- Change the Vaadin version JAR in your project to the oldest version you wish to support. Recompile both client and server-side code and test the add-on in an application.
Documenting an Add-on
Documentation is about quality and ease of use. The more documentation you provide, the better your add-on is considered. Consider including the following documentation:
- Javadoc: Make good use of Javadoc. Remember developers are your end-users and this is a major part of the user experience.
- Most important use cases and add-on APIs: Break into code and explanation. Use Markdown and put the most obvious use case already in the description.
Tutorial: Write a tutorial (e.g., a wiki page or a blog post), that summarizes:
Installation process: Remember not everyone uses Eclipse or IntelliJ.
External dependencies: What should be downloaded and where to put the dependencies. Resolve typical misconfiguration issues in advance. You can also describe dependencies in a Maven pom.xml file. -
Also, depending your add-on you might consider:
- Publicly available source code in GitHub or Bitbucket or your own VCS (like SVN, Git, CVS, etc.).
- Reference: Documentation for the add-on. This depends on the component, but typically includes component APIs and CSS styles.
- A feedback system. Use uservoice.com, for example. GitHub also offers a free feedback system for open-source projects.
Vaadin Add-on Dependencies
There are basically three kinds of dependencies to handle:
- Add-on requires another add-on to be installed: Link to the add-on in the Vaadin Directory. Add a note in the add-on description.
An external JAR is needed: Package the add-on as a ZIP and include the external JAR. Link to the original download page.
Same classes are used in separate add-ons: Consider compiling a separate add-on from common classes.
Vaadin add-ons do not manage external dependencies, and you need to take care of this. However, if you use Maven and package your pom.xml file inside the add-on JAR, it will be used when the add-on is deployed into the vaadin-addons Maven repository.
Creating a Maven pom.xml for Vaadin Add-on Dependencies
Maven automates handling of add-on dependencies. This is through a pom.xml file, which should list all the dependencies. Vaadin add-ons are automatically published to a Maven repository and if there is a pom.xml file in the add-on JAR file it is used.
If you are not using Maven to create an add-on with dependencies, you can also include the pom.xml by hand by adding it to META-INF/maven/[groupId]/[artifactId]/pom.xml.
Here is an example pom.xml file with dependencies:
<?xml version="1.0" encoding="utf-8"?>
<project xmlns="http://maven.apache.org/POM/4.0.0"
        xmlns:xsi="http://www.w3.org/2001/XMLSchema-instance"
        xsi:schemaLocation="http://maven.apache.org/POM/4.0.0 http://maven.apache.org/maven-v4_0_0.xsd">

   <modelVersion>4.0.0</modelVersion>
   <groupId>org.vaadin.addons.awesome</groupId>
   <artifactId>youtubeplayer</artifactId>
   <version>1.0.1</version>
   <dependencies>
       <dependency>
           <groupId>org.vaadin.addons</groupId>
           <artifactId>swfobject</artifactId>
           <version>1.1.0</version>
       </dependency>
   </dependencies>
</project>
Note: If you use the Eclipse Plugin when exporting the add-on, please take care of the following:
- The version number in the pom.xml must match the version given in the export wizard.
- The pom.xml must be manually selected to be included in the add-on JAR.
Publishing Add-ons in Vaadin Directory
After successfully creating an add-on package, log in to vaadin.com/directory and and go to "My Components" page. Here you can manage your previous submissions, to publish a new add-on click "New Component" in the top right corner.

If you are distributing the add-on through the Directory, select the Vaadin version of the add-on you are uploading and choose the add-on ZIP package created in the Maven target folder. If your add-on is already in Maven Central, choose "Via Maven Central".
Information coming from pom.xml or add-on JAR manifest
Some information is read either from the pom.xml or from the manifest file of the add-on JAR and cannot be modified in the web UI anymore.
- Add-on Name: Name: The official name of the add-on. This cannot be changed later. You can use Vaadin as part of the name, for example "MyComponent for Vaadin" or just "MyComponent"
- Add-on Version: The version of the add-on JAR. You can only submit multiple versions of the same add-on if they have different version numbers. The version is a string and the recommended versioning method is to use two or three levels
<major>.<minor>.<build>, for example,3.2.1. Another rule of thumb is to use major-version < 1 for experimental add-ons and >= 1 for others. Note that you cannot submit snapshot versions to the Vaadin Directory.
General add-on information
This information is used in both Vaadin Directory search results and on the add-on details page. It is also indexed by external search engines. The purpose of this information is to help people find your component and understand what it provides and how it works.

- Published: Indicates whether the add-on is published or not. Note that you cannot turn this on unless at least one version of the add-on is available.
- Icon: The icon is shown in search results and on the details page. It should be square (1:1 aspect ratio) and less than 100KB. Accepted formats: PNG, JPG, GIF. You can crop and optimize GIFs using online services, like https://ezgif.com.
- Summary: A one-liner describing the purpose of the add-on. This is what users see first when browsing add-ons.
- Description: A more detailed description of the add-on. Explain the purpose of your add-on and provide a sample use case. This is indexed for search. You can use Markdown syntax for formatting.
- Categories: Categories help people find similar add-ons. Choose as many as you like, but 3-5 is typically optimal.
-
Samples:
- Previews: Take a screenshot of your add-on if it is a widget or has a user interface. A good maximum size is 800x600 pixels.
- Code samples: A piece of code that demonstrates at least the most typical use case.
- YouTube video: A video showcasing the add-on or providing a tutorial.
-
Related links:
Online demo: Provide a link to a live demo. The best way to showcase your widget or component is to let users interact with it.
Source code: Provide a link to the public source code of the add-on. You can use GitHub, Bitbucket.
Discussion forum: Link to an external discussion forum if you have one. Note that discussion is also possible in the directory itself.
Issue tracker: Link to an online issue tracker where users can leave feature requests and bug reports.
You might also want to list things like:
- External add-on descriptions and/or project hosting.
- Download links for dependencies. Sometimes it makes more sense to make the dependency download available from the original site.
- Links to other relevant developer information, like specifications.
Version-specific information
You can publish and continue publishing multiple versions of your add-on. Typically, the same functionality is available for many Vaadin versions in a single add-on with just a different major version number.

- Available: Turn this on to make the add-on JAR available for download. Note that you must make at least one version available before you can publish the add-on. All available versions appear in the "Component versions" drop-down list on the details page.
- Supported frameworks: List the supported Vaadin versions. Remember to test thoroughly.
- Release notes: Include a short summary of what has changed and been added in this specific version. This will show up in the "Release notes" section on the details page. Markdown is supported here.
- Browser compatibility: Check all browsers that you have verified the add-on works with. For data components, check "Browser independent" option. Note: Don't use the "Browser independent" option for UI widgets; instead, test and verify the supported browsers.
- Maturity: Check the applicable option. You can also request official certification for your add-on. Here are the guidelines:
- Stable: The add-on is fully functional, the API is stable, all non-obvious limitations are documented, and the documentation is complete. The publisher recommends using the add-on for production applications and is not aware of any major bugs.
- Beta: The add-on is fully functional, the API is stable, and major limitations are documented. Some documentation might still be lacking, and the publisher expects there to be bugs.
- Tested: The add-on is feature-complete and has been tested to work as-is.
- Experimental: The add-on is still incomplete and is not recommended for use by the publisher. The reason for including experimental add-ons is to provide feedback to the publisher and to make sharing as easy as possible.
- Imported: The add-on was imported into the Vaadin Directory, but it has not been tested yet.
- Not maintained: This version is still available but is not actively maintained. This is useful for supporting older Vaadin versions.
- Licenses: Choose the license for your add-on. If unsure, use the Apache 2.0 as it is the same license that Vaadin uses.
Removing Add-ons from Vaadin Directory
It is not possible to completely remove an add-on from the Vaadin Directory. Otherwise, someone might use the same add-on name with different content, which would be confusing for users.
However, you can hide an add-on from public display by unpublishing it. If you made an error uploading an invalid package to the directory, you can delete the version and upload it again. To do this, go to vaadin.com/directory, log in to your account, and click "My Components" in the top right corner.